API Usage
Introduction
Smart Answering has a public REST API, so your own tools and scripts can read your organization's data and act on it. The API covers conversations, agents, contacts, and outbound campaigns.
To use the API you need an OAuth client, which is a client ID and a client secret that an organization admin creates in Smart Answering. Your application sends that pair to the token endpoint, gets a short-lived access token back, and sends the token with every API request.
The same credentials also cover the MCP endpoint, so a single client can serve both a REST integration and an AI agent connected over MCP.
If you only want to use Smart Answering from an AI assistant such as Claude, you don't need an API client. See Connect an AI Provider instead.
What You'll Learn
In this topic, you'll learn about:
- What you need before you start.
- How to create OAuth client credentials.
- How to save your credentials safely.
- How to get an access token and make your first call.
- Where to find the full API reference.
- Worked examples for the outbound call handoff endpoints.
Before You Start
To create API credentials, you'll need:
-
A Smart Answering account with the Admin role in the organization you want to read.
-
Somewhere secure to keep the client secret, such as a password manager or your team's secret store.
An OAuth client can only reach the data of the organization it was created in. If you work with more than one organization, create a separate client in each.
Create OAuth Client Credentials
You create credentials in the Smart Answering web app. Each screenshot below shows the screen you should be on at that point in the steps.
-
In the left navigation, click your organization name to open the organization menu, then click Settings. The Settings button only appears if your role in the organization is Admin.
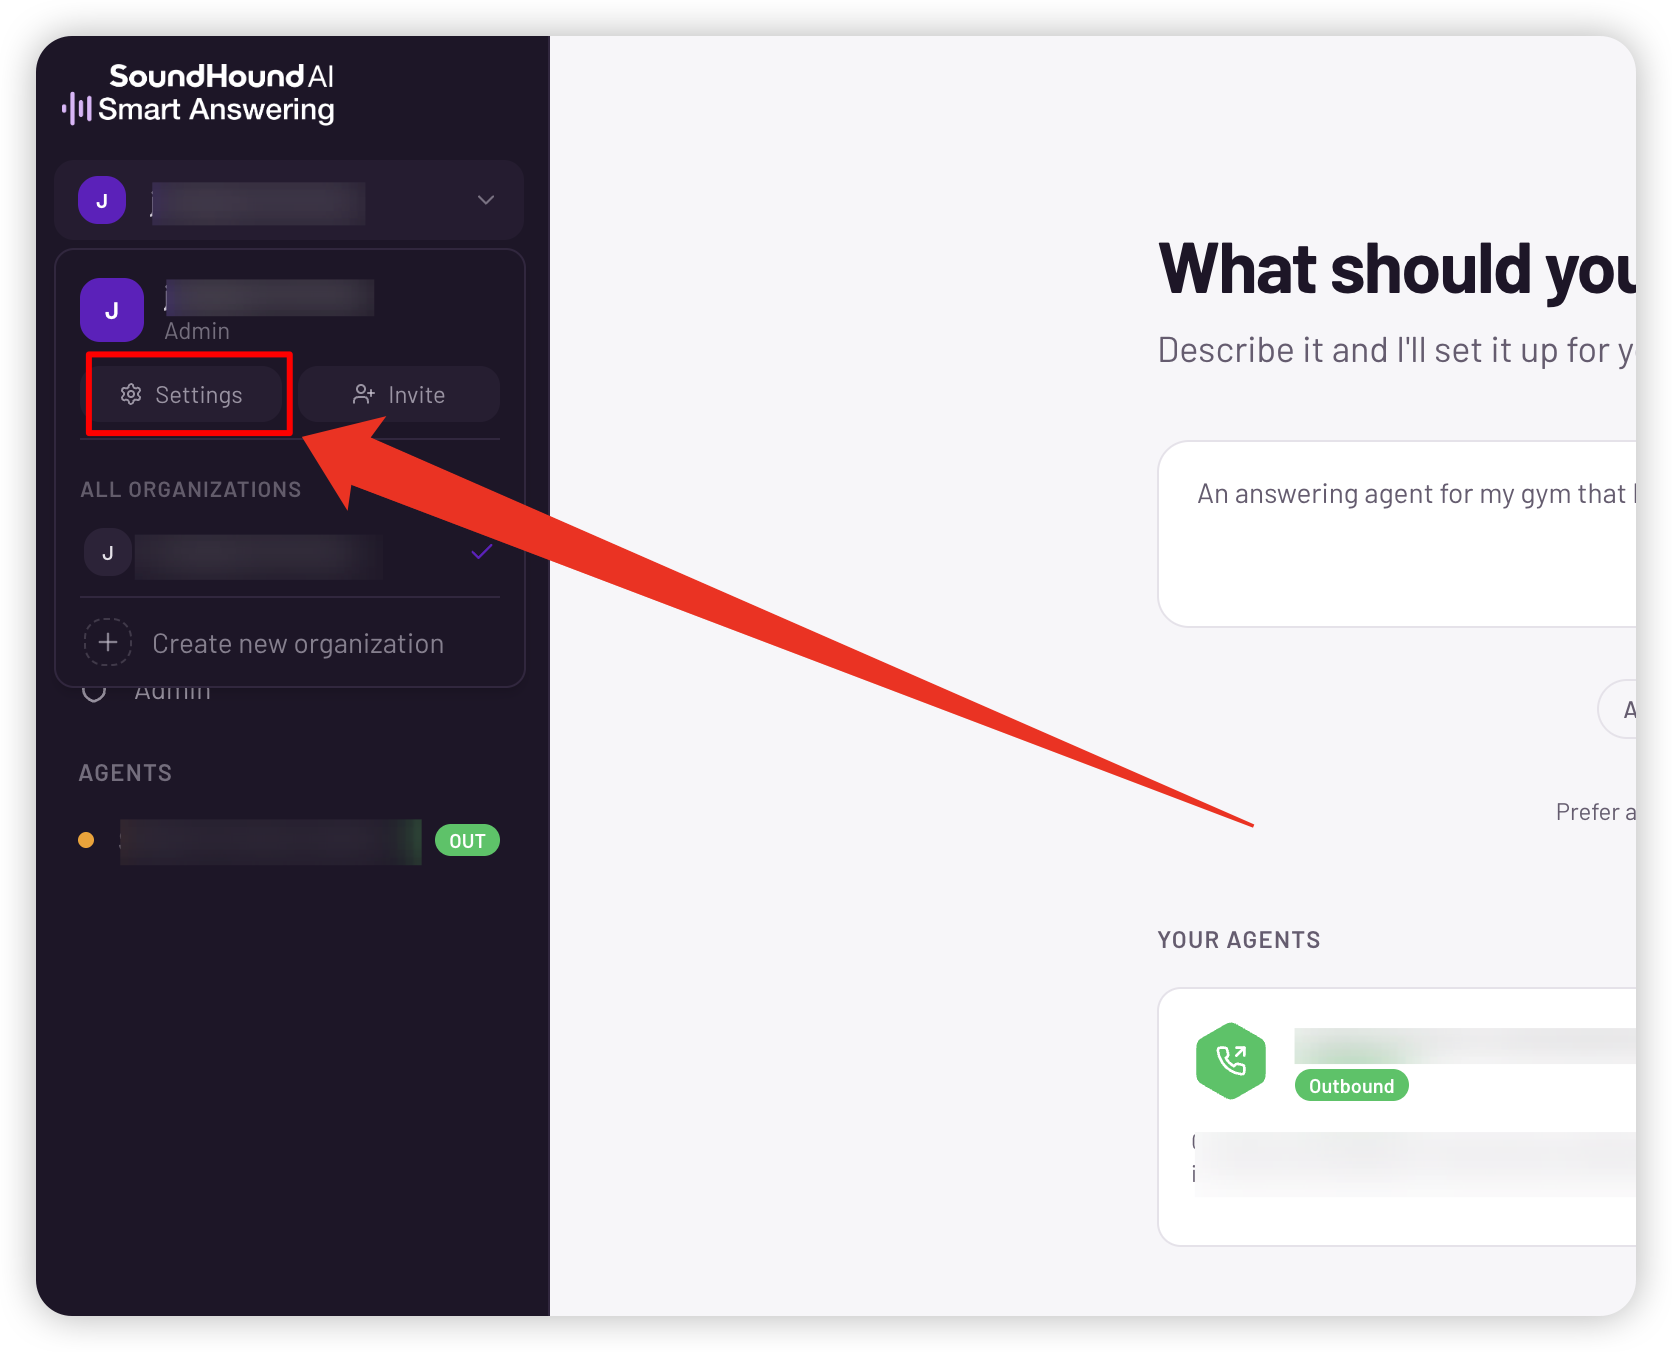
The organization menu, with Settings directly below your name and role. -
In the settings navigation, under ORGANIZATION, click OAuth Clients.
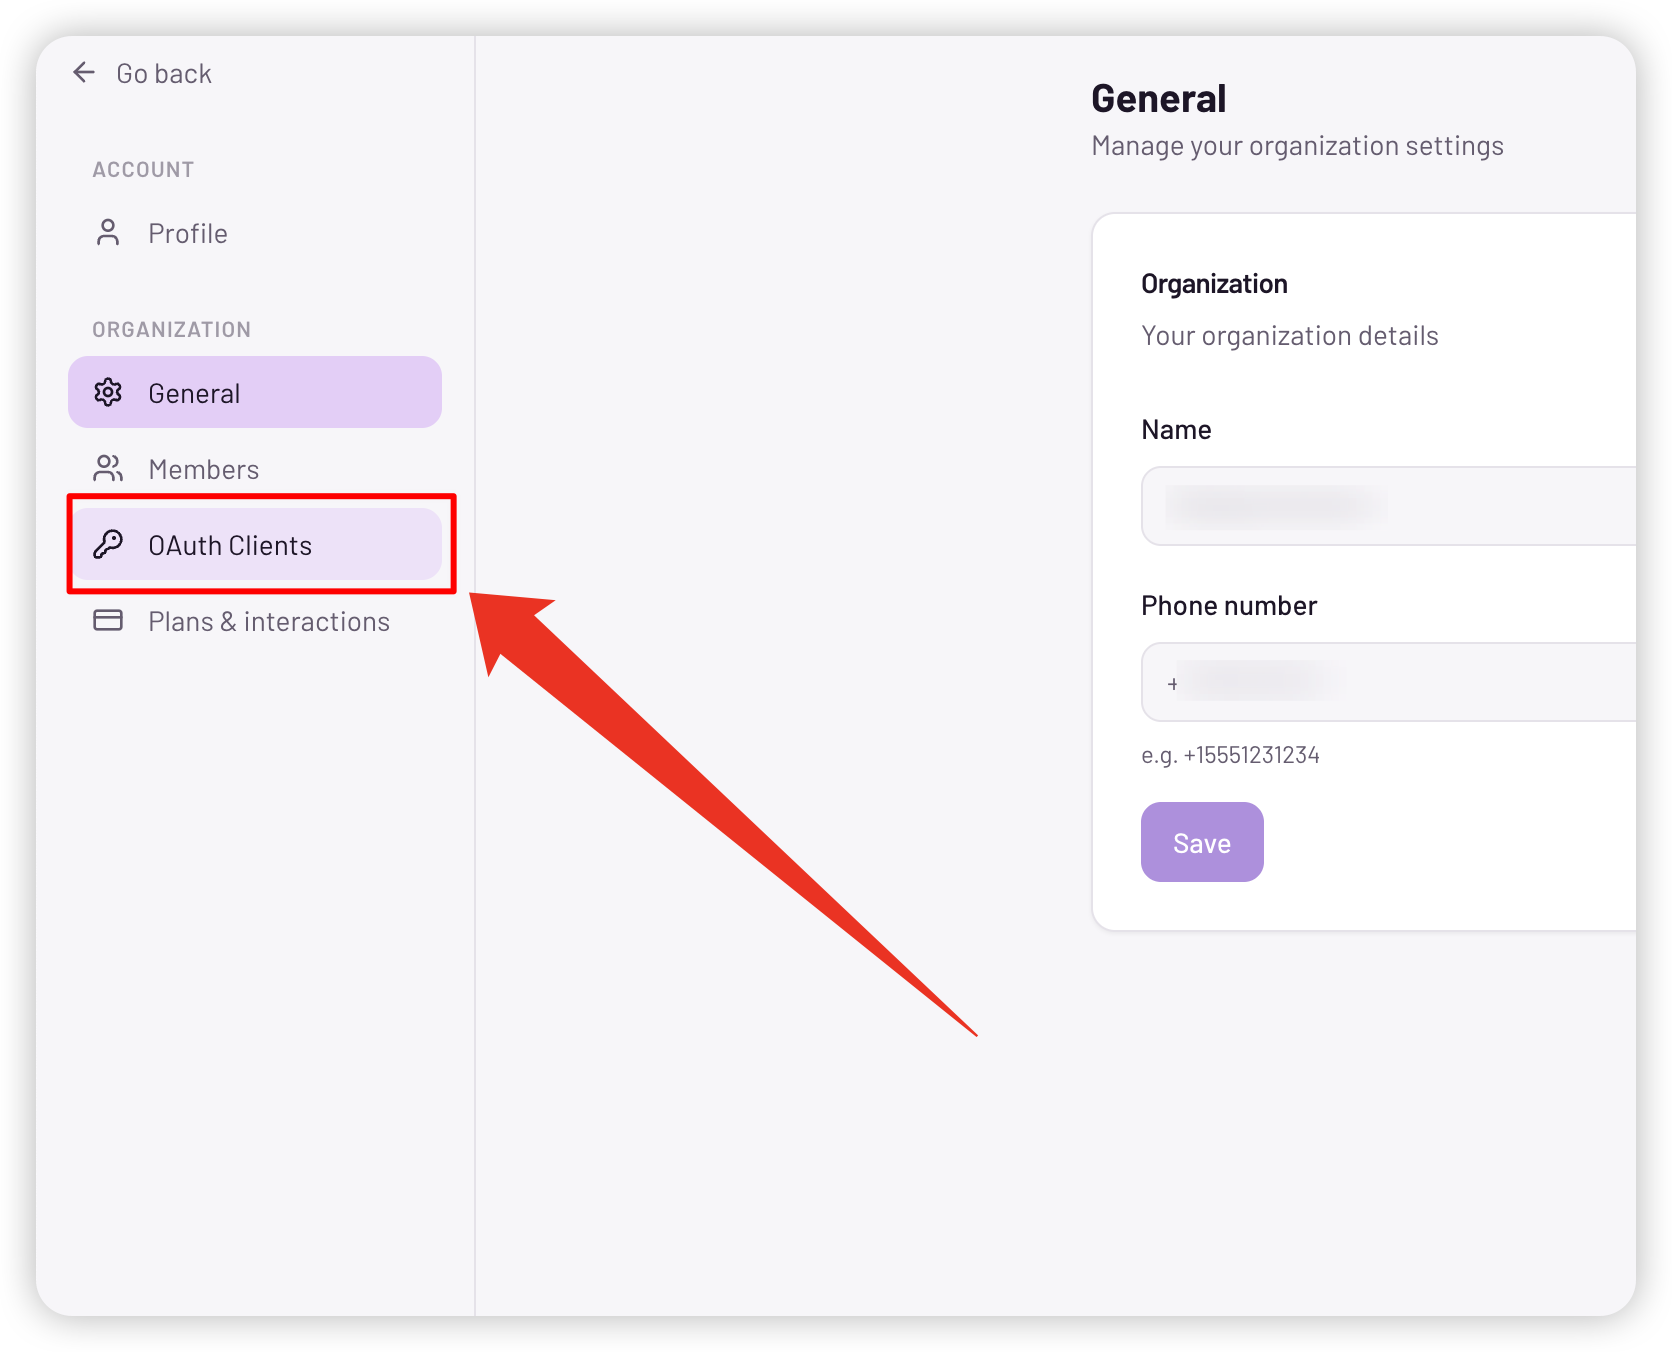
OAuth Clients sits under ORGANIZATION, between Members and Plans & interactions. -
The OAuth Clients page lists the clients that already exist in the organization, and it's empty the first time you open it. Click + Create client.
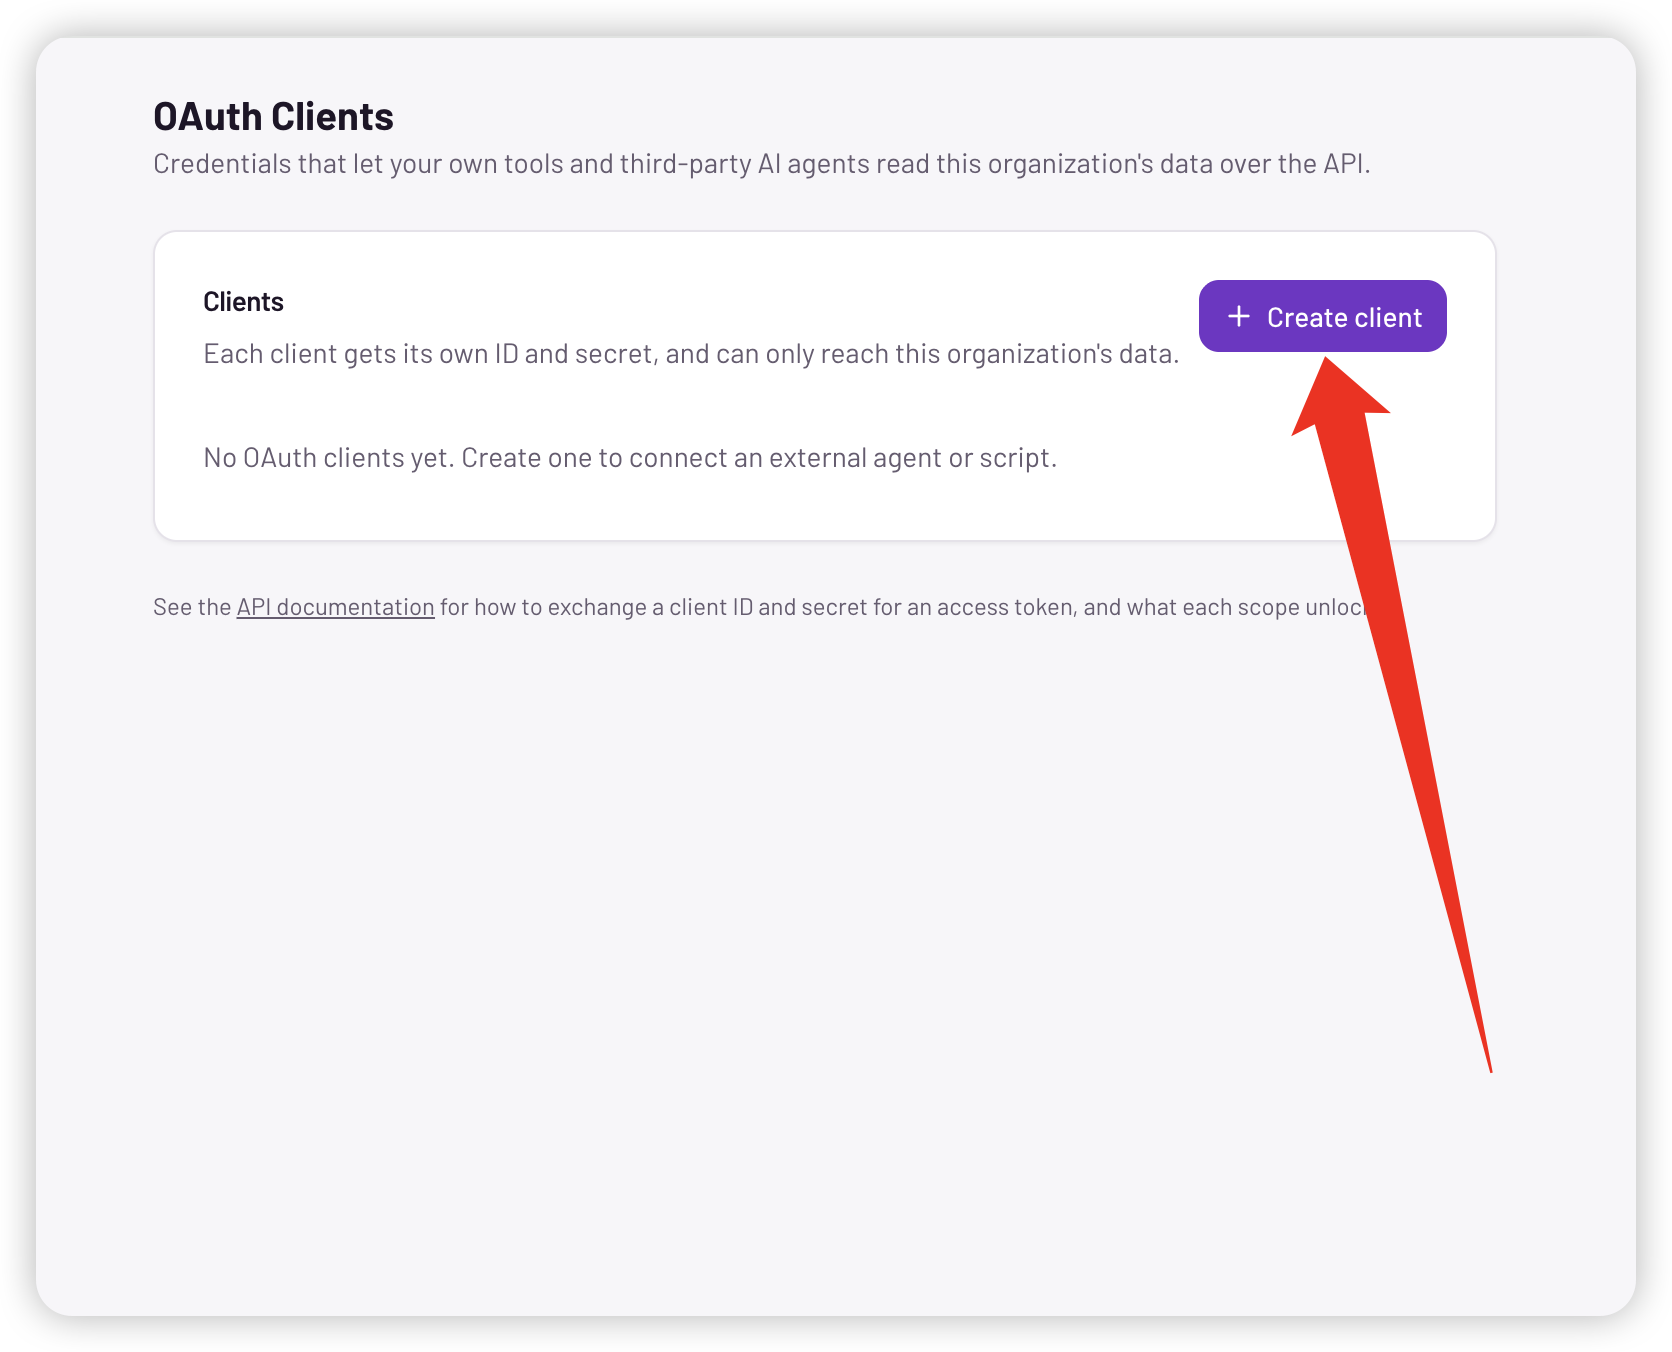
The OAuth Clients page before any client has been created. -
Fill in the Create OAuth client dialog, then click Create client.
-
Client name is a label you'll see in the client list, so use something that says where the credentials will be used, for example
billing-syncorreporting-script. -
Access controls what the client can reach, and both options are selected by default:
- MCP tools lets the client read conversation, agent, contact, and outreach data over
POST /mcp. - Open REST API exposes the same tools as REST endpoints under
/api/open.
To make the calls shown on this page, leave Open REST API selected.
- MCP tools lets the client read conversation, agent, contact, and outreach data over
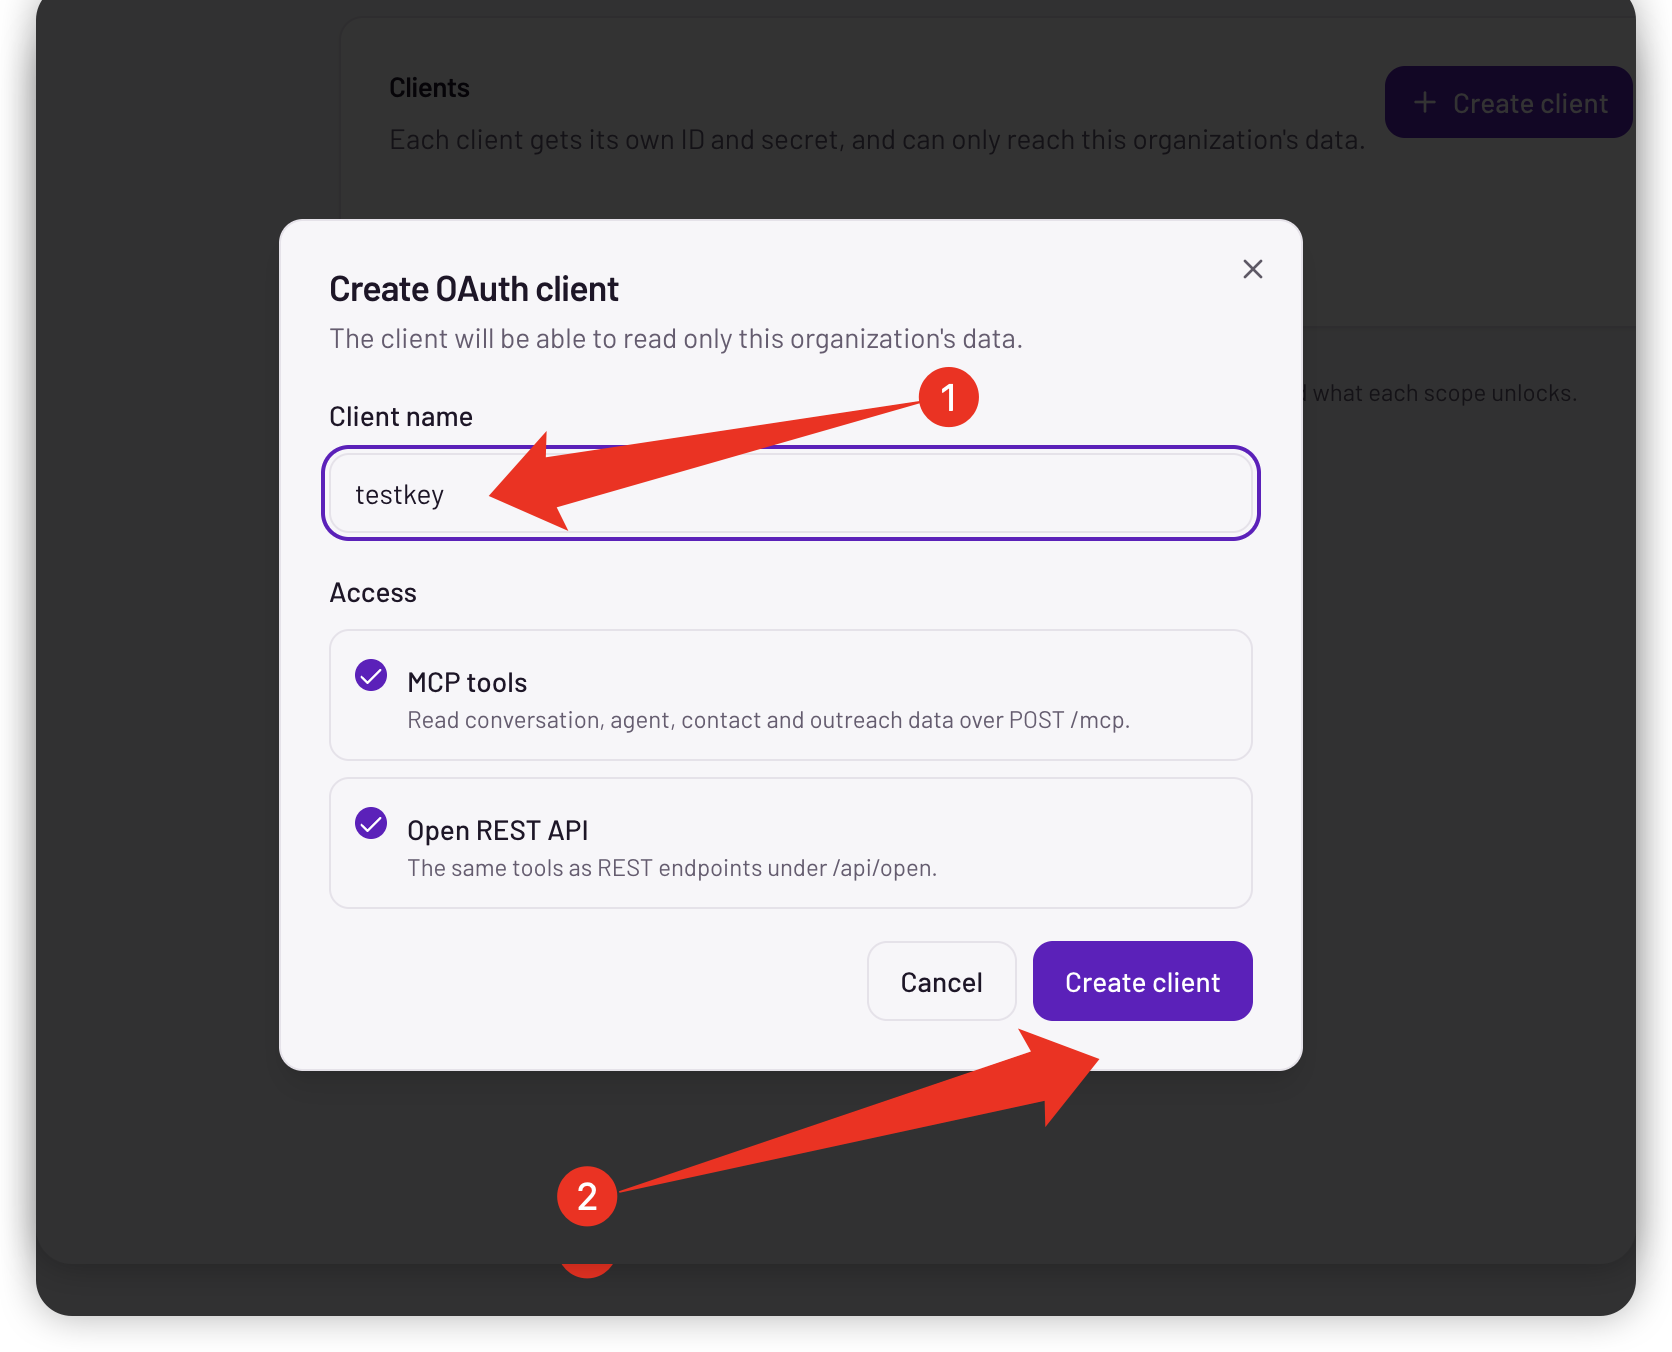
Naming the client and choosing what it can reach. -
-
The Client created dialog shows your new credentials. Copy the Client ID, which starts with
cc_, and the Client secret, using the copy button beside each field. Store both somewhere safe, then click I've saved it.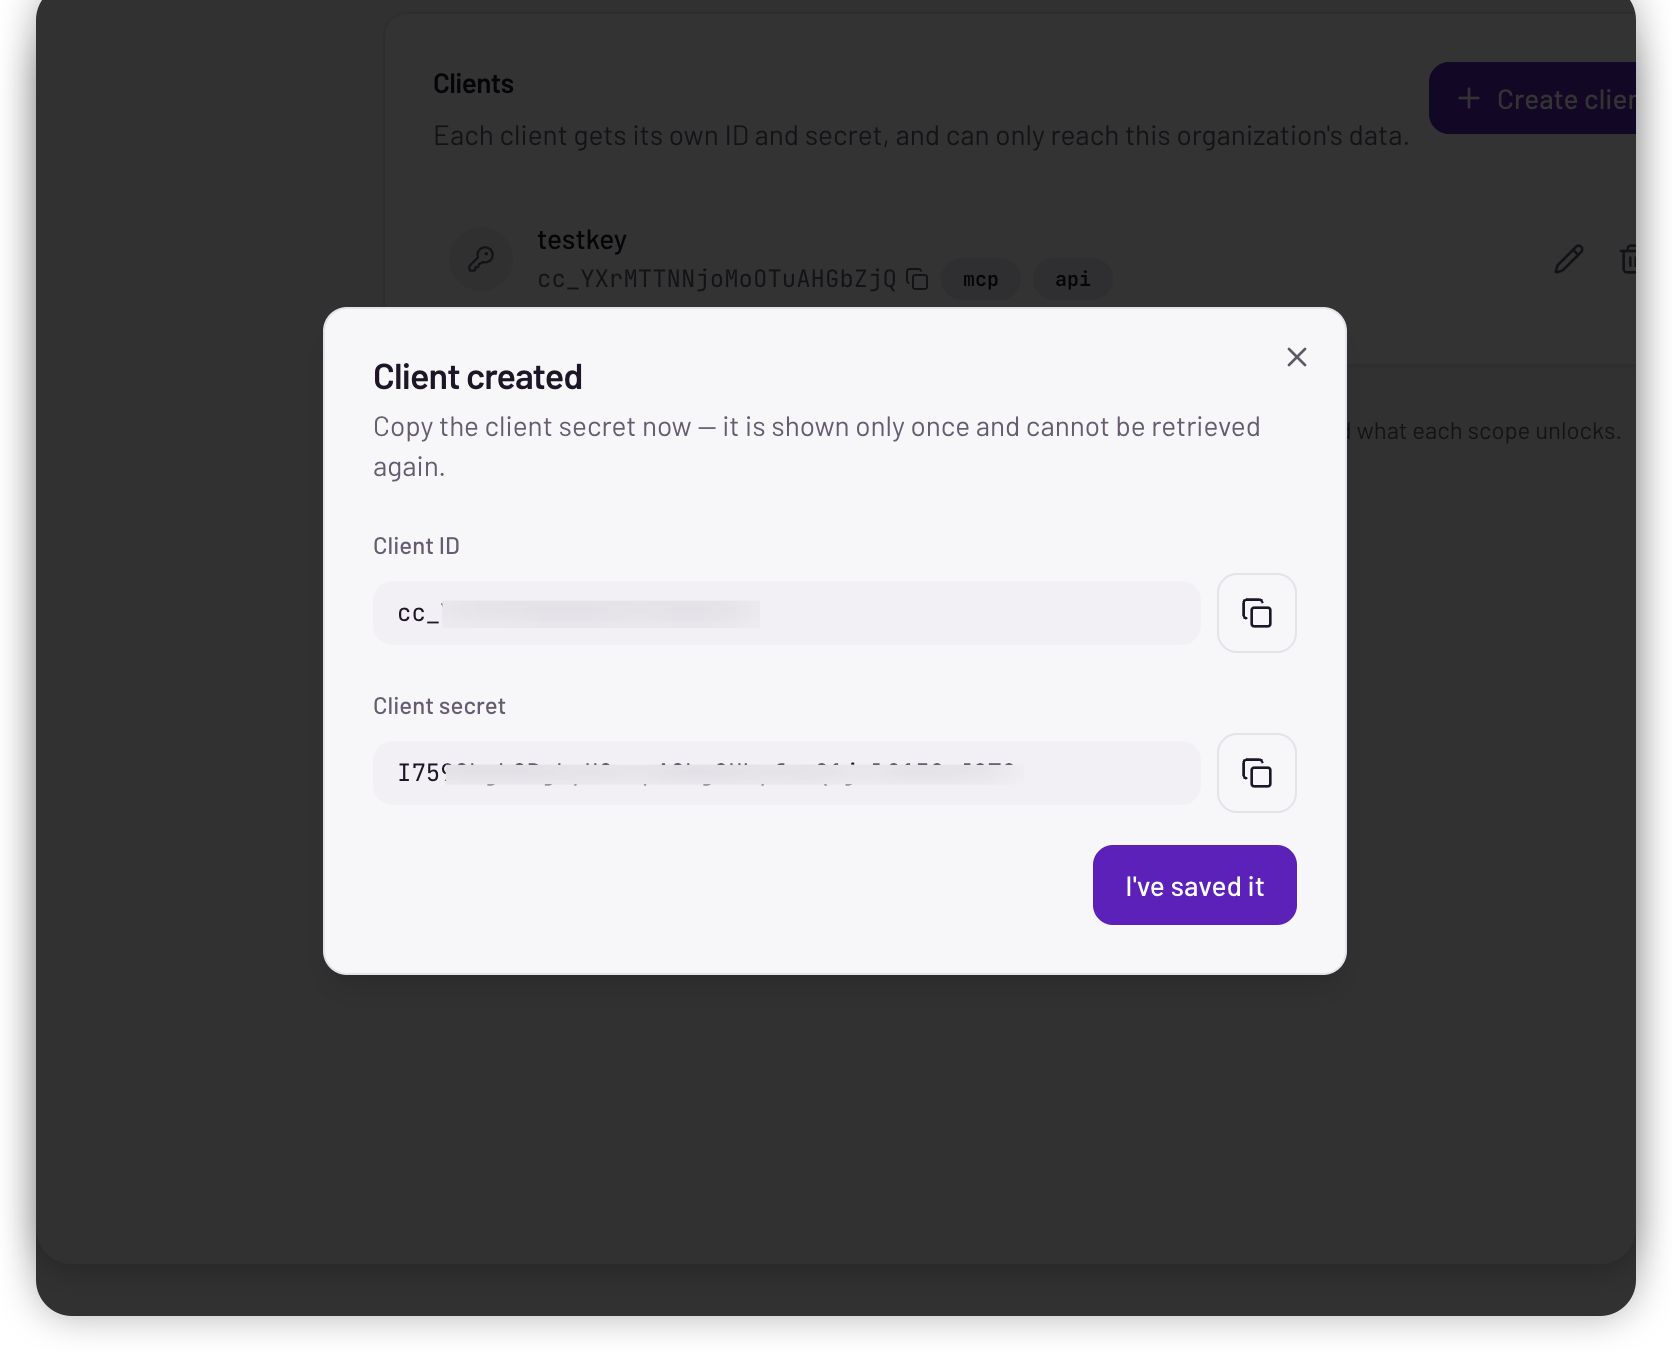
The client secret is only ever shown in this dialog.
Save Your Credentials
The client secret is shown only once. After you close the Client created dialog, nobody can retrieve it, including our support team.
Before you close the dialog:
-
Copy the client secret into a password manager or your team's secret store.
-
Keep it out of source control, chat messages, and shared documents, and treat it like a password.
-
If you lose the secret, delete the client on the OAuth Clients page and create a new one. Remember to update anything that was using the old credentials.
Your client ID is not secret, and it stays visible in the client list along with the scopes the client was given.
Get an Access Token
Exchange your client ID and secret for an access token using the client_credentials grant:
curl -X POST https://smart-answering-smb.soundhound.com/oauth/token \
  -H "Content-Type: application/x-www-form-urlencoded" \
  -d "grant_type=client_credentials" \
  -d "client_id=cc_YOUR_CLIENT_ID" \
  -d "client_secret=YOUR_CLIENT_SECRET" \
  -d "scope=api"
The response looks like this, where expires_in is the lifetime of the token in seconds:
{"access_token":"ey......","token_type":"bearer","expires_in":3600,"scope":"api"}
Send the access_token value as a bearer token on every API request:
curl https://smart-answering-smb.soundhound.com/api/open/organizations \
  -H "Authorization: Bearer YOUR_ACCESS_TOKEN"
Start with GET /api/open/organizations. Every other endpoint needs an orgId, and only the ids returned by that call are accepted.
A few things worth knowing about tokens:
- Endpoints under
/api/openrequire theapiscope. A token scoped only tomcpgets403 insufficient_scope. - If you omit
scope, aclient_credentialsrequest is grantedmcp api. - The grant doesn't return a refresh token, so request a new access token when the current one expires.
- The token endpoint is rate limited to 30
client_credentialsrequests per 15 minutes per IP address. Cache your token instead of requesting one per call.
API Reference
The complete reference, covering every endpoint, its parameters, and its response format, is published at:
https://smart-answering-smb.soundhound.com/api/open/docs
It's an interactive Swagger UI. Click Authorize, paste an access token, and you can try any call from the browser.
Next Steps
For worked examples of individual endpoints, see Outbound Call Handoffs, which walks through fetching the context behind a campaign call and writing a transcript back to a session.
Prefer a no-code option? See Connect an AI Provider to link Smart Answering to Claude. To learn more about your agent, read our Getting Started page or FAQs page. Or contact our support team with any questions.